5 Insanely Easy Way to Have the Best Brows.
Simple tweaks to make a huge difference. A few steps for DIY brows, and how to do brows below.
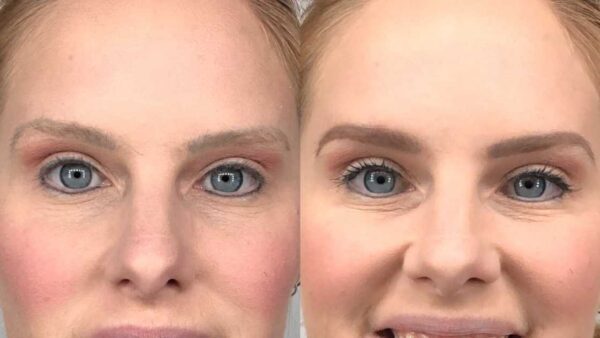
Brows are one of the most important features on your face. It is the frame to the windows of your soul! So, it’s important that we don’t neglect them, lets give them the attention they deserve. Here are 5 super simple ways, you can properly fill in, trim and show off your best brow, taking them from “buhhh” to “BAM!!!” These tips are great, keep reading or watch the video; 5 Insanely Easy Ways to Have the BEST BROWS of your life, if you’d rather!
I know busy brows are in, but this is not what I am talking about. If you were born with one eyebrow like myself, go ahead and break that brow up into two brows. A little grooming, tweezing some wild hairs, and trimming down the long unruly hairs will really start to give your face more structure. Make sure you are using your natural brow shape, this is not a job to use your creativity. If you are wanting ore training on how to line up your brows, and more step by step on shaping brows join my FREE Online Beauty Community answer a few questions there and BOOM you are in!
Alright, no ones brows look great with solid color and pretty please do not fill your brows in with a heavy hand, and one single stroke. Tiny, quick, flips of the brush is the motion you should use to apply your brow products like my favorite precision pencil or for powder try, this brow obsession palette. The goal is hair like strokes in the direction your hair grows.
To keep your brow game strong, we need to keep the arch strong. That is why I recommend starting at the middle of you brow. You will have more product on your brush and this area should be darker than the are by your nose. When you start working towards the bridge of your nose you will have the least amount of product on you brush which is great because this should be the lightest part of your brows.
For this we are going to call the end of your brow the tail. If your tail is over extended it can cause your eyes to appear droopy, making you look sad and tired. To measure where the tail of your brow needs to end, place a pencil diagonally at your nostril and line it up with the corner of your eye. Where the pencil lands on your brow bone is where the tail of your brow should end or should be extended to. This will lift your face up and brighten your eyes.
Filling in your brows and not buffing them afterwards is a total dead giveaway that they are drawn on! After using small strokes to fill and shape your brows, use a spoolie to buff out any harsh lines with a back and forth motion. And to check out my Free Beginners Guide to Eye Brushes click here!
If just setting goals is what it took to make stuff happen we’d have so many millionaires, pro athletes and entrepreneurs slaying! It’s not that easy so I am sharing…

Content creation is the name of the game with online marketing. The struggle of creating high quality content consistently can be or is one of the most challenging tasks for…
Leadership skills are important whether you’re running a business, managing a team, or teaching a class. Inspiring and leading people comes naturally to some people, but not to most of…

Why Network Marketing is the future and a viable Option for Working from Home. Back in 2003 I opened a salon when I was 19 years old. Best hands on…
70% of Americans struggle with stress and anxiety. If that is you know you are not alone. I have listed some of my top ways to help lower the side…
I am really excited to share these 5 ways to help you stay focused that will help you if you could implement them. The first thing I want to talk…